In this article, we’ll discover data manipulation statements used to modify data in the SQL server using the INSERT, UPDATE, DELETE, and MERGE statements.
These are also called DML (Data Manipulation Language) statements. In this article you’ll learn to use these data modification statements to add, modify, and remove data. Finally, we’ll wrap up the discussion with MERGE.
All the examples for this lesson are based on Microsoft SQL Server Management Studio and the AdventureWorks2012 database. You can get started using these free tools using my Guide Getting Started Using SQL Server.
Table of contents
Adding Rows
Use the INSERT statement is to add one or more rows to a database table.
You can insert data either one row at a time or in bulk by adding rows from one table to another.
Place the INSERT statement, like other DML statements, within a transaction. Based on the success of the transaction you can either COMMIT or ROLLBACK the changes.
You’ll find using transactions are important once you start stringing multiple data modification statements into a single operation.
Using @@ROWCOUNT
The @@ROWCOUNT is updated and available immediately after each DML statement execution.
The basic structure of the INSERT statement is
INSERT INTO tableName
(column1, column2, …)
VALUES (value1, value2, …)
As you can see the basic structure for the insert statement is to:
- specify the table we wish to insert rows into
- the columns we wish to populate
- the values to insert.
Example with Transaction
Let’s look at a specific example. In this simple example, we’re going to insert a row into the Department table.
Notice that we’re specifying the table, columns, and values we wish to insert.
BEGIN TRANSACTION
INSERT INTO HumanResources.Department (Name, GroupName)
VALUES ('Risk Management', 'Executive General and Administration')

SELECT Name, GroupName
FROM HumanResources.Department
ROLLBACK
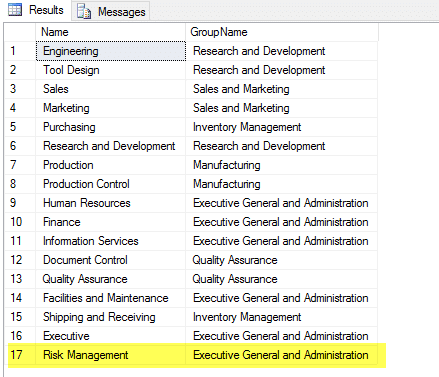
When you run this you see the newly inserted row below

You may be wondering why I have wrapped my example in a transaction. I did this so I don’t permanently save my changes. If I didn’t, I could only run this particular example once!
Start transaction with BEGIN TRANSACTION and reverse any unwanted changes with ROLLBACK.
It is a good trick you can use when you want to test out an insert but don’t want it to persist. Of course, you should test any data modification operations within your development or test environment! Never test within your production environment.
If you want to dig deeper, then check out my article Introduction to the Insert Statement.
Updating Rows
You can change one or more database rows using the UPDATE statement.
Since the update statement can affect one or more rows, you should take great care in making sure your updating the rows you wish!
Like the INSERT statement, the update can be part of a transaction. Based on the success of the transaction you can either COMMIT or ROLLBACK the changes.
Once an UPDATE statement completes, @@ROWCOUNT is updated to reflect the number of rows affected.
The basic structure of the UPDATE statement is
UPDATE tableName
 SET column1=value1, column2=value2,...
 WHERE filterColumn=filterValue
The UPDATE statement is typically in three parts:
- The tableName to update
- The SET clause which specifies the columns to update
- The WHERE clause, which specifies which rows to include in the update operation.
Update Example
Let’s look at a specific example. In this simple example, we’re going to update a row into the Department table.
Let assume that the director of Human Resources wants to change the Information Services department name to Information Technology.
Here is the UPDATE statement you could use:
BEGIN TRANSACTION
UPDATE HumanResources.Department
SET    Name = 'Information Technology'
WHERE  DepartmentID = 11

SELECT DepartmentID, Name, GroupName
FROM   HumanResources.Department
ROLLBACK
Note: I wrapped my example in a transaction so that I don’t permanently alter my sample database.
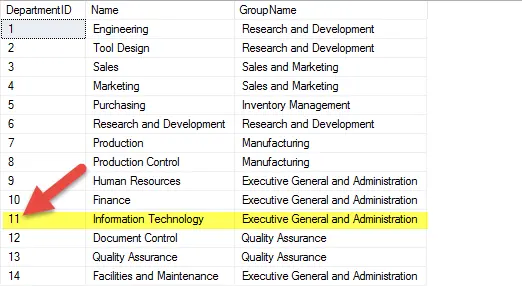
Here you can see the newest update value.

Notice that the UPDATE statement specifically targets the row using the primary key DepartmentID. By doing this I can guarantee I’m updating the correct row.
Take care when writing the UPDATE statement. You really need to be sure the WHERE clause is including only those rows you wish to update. A poorly written WHERE clause has burned many people!
Before I write my UPDATE statement, I usually test out the WHERE clause using a SELECT. If the select returns the correct rows, I can be sure the update’s scope is correct.
Read More: SQL UPDATE Statement >>
Removing or Deleting Rows
Use the DELETE statement to remove one or more rows from a database table.
Since the DELETE statement can affect one or more rows, you should take great care in making sure you’re deleting the correct rows!
Like the INSERT statement, the DELETE statement can be part of a transaction. Based on the success of the transaction you can either COMMIT or ROLLBACK the changes.
Once a delete statement completes, @@ROWCOUNT is updated to reflect the number of rows affected.
The basic structure of the DELETE statement is
DELETE tableName
WHERE  filterColumn=filterValue;
The DELETE statement is typically in two parts:
- The tableName to update
- The WHERE clause, which specifies which rows to include in the update operation.
Let assume that the director of Human Resources wants to remove all pay history changed before 2002.
Here is the DELETE statement you could use:
BEGIN TRANSACTION
DELETE HumanResources.EmployeePayHistory
WHERE  RateChangeDate < '2002-01-01'
ROLLBACK
Of course, before you run this I would test with a SELECT statement. This is the statement I would run to make sure what I’m intending to delete is correct.
SELECT BusinessEntityID, RateChangeDate
FROM   HumanResources.EmployeePayHistory
WHERE  RateChangeDate < '2002-01-01'
When you run this statement, the specified rows are removed from the table.
Read More: SQL DELETE Statement >>
MERGE Statement
The MERGE statement provides a means to perform, in one statement, an INSERT, UPDATE or DELETE operation on one table based on the source data from another.
The main advantage of using the MERGE statement is that when it executes it makes one pass through the data, as opposed to a pass for each operation (e.g. three passes for separate INSERT, UPDATE, and DELETE data manipulation statements).
The basic structure for the MERGE statement is
MERGE targetTable
USING sourceTable
ON joinCondition
WHEN MATCHED  --update
WHEN NOT MATCHED --insert
WHEN NOT MATCHED SOURCE --delete
The basic idea is to perform an INSERT, UPDATE, or DELETE operation on the targetTable, using the sourceTable as input. The targetTable and sourceTable rows are matched to one another according to the join condition.
Depending upon the match, then DML statements, such as INSERT or DELETE, are executed.
For example, if you looking to update one table with values from another, then “WHEN MATCHED” it would make sense to update the rows, and “WHEN NOT MATCHED SOURCE” delete the row from the target, as it wasn’t found in the source.
Hopefully, you can see that the MERGE statement is very powerful. It can be used to combine several operations, which, if used without the MERGE would require you to write a stored procedure using conditional logic. This in itself isn’t, bad, but it does make it simpler to write code.
Don’t worry if you don’t completely understand how merge works, we’ll revisit in detail in another article.
Read More: SQL MERGE Statement >>
Conclusion
Use the INSERT, UPDATE, DELETE, and MERGE stateement to upate our code. Collectively, we call these Data Manipulation Language or DML for short.
Before you tackle MERGE, be sure to understand how INSERT, UPDATE, and DELETE work to help you modify your table’s data. You’ll find you write sweeping queries to update many items at once, or pinpoint the queries to single row.
Dig Deeper into DML.
Read these post to learn even more!


